At Don't Forget To Move we help promote and inspire adventurous, authentic and responsible travel around the world. With a lot of crazy stories in between! We show travelers how to see the world authentically through unique stories, engaging photography and videos, honest reviews and practical travel tips.
Asdigital nomads we have the luxury of living anywhere in the world. We love to daydream and research new countries to learn about what local life is like in those places. Coming from Melbourne, which has been rated the world’s most liveable city, and San Francisco, which is so popular it has become one of the most desirable cities in the world, we’re pretty blessed as far as standard of living. Coming from these two diverse and vibrant destinations, it’s pretty difficult to find somewhere that might compare. But one place that we’ve heard over and over is equally as liveable is Singapore.
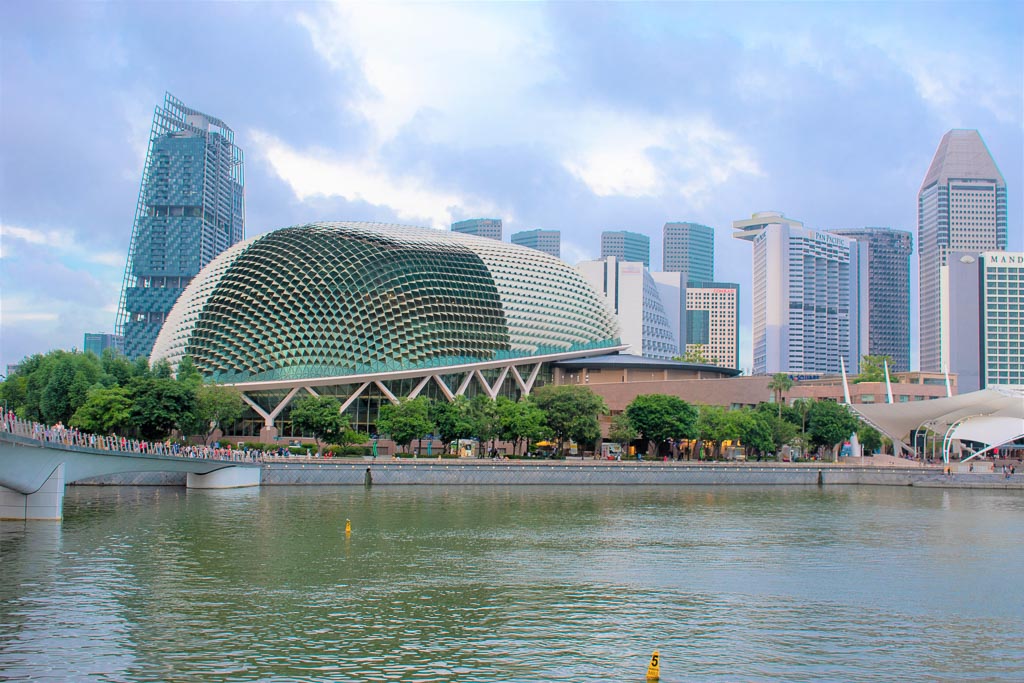
This tiny island city-state off the coast of Malaysia actually comprises 64 offshore islands around the mainland. You’ve probably seen some of Singapore’s incredible sites floating around social media, including the world’s tallest indoor waterfall in the Jewel Changi Airport. But more than just its famous tourist attractions, the bustling city is a wonderful place to live.
While the city-state’s cityscape is known for its skyscrapers, the landscape is actually incredibly green and lush. Almost half of its land area is under green cover. The young nation is incredibly safe, with one of the lowest crime rates in the world. The city-state is also known for its cleanliness. Safe, clean and lots to do?! Who wouldn’t want to live there?
Permanent Residence Application
So now that we’ve sold you on the idea of living in the city-state, let’s talk logistics. Citizens of most countries around the world are allowed to stay there for 30 days without a visa. If you’re from the United States, Australia, the UK and a few other countries you are able to stay for 90 days. However, if you want to stay in the country for long-term, you’ll need to apply for permanent residence status. With Singapore PR (SPR) status you will be able to live, work, study and ultimately retirein that country for any extended length of time. You’ll also have access to subsidized health care, public education for your children, as well as tax benefits.
Permanent Residency status in the ever-evolving metropolitan city is, not surprisingly, highly sought after. The government has put a 30,000 annual cap on how many Permanent Residency applications it accepts. Not only is the applicant competitive, but the process to becoming a PR, it’s also tedious and complicated.
Luckily, there are immigration consultancy firms that can make the entire process a breeze. And we can tell you first hand after going through the process of applying for Jules’ US Permanent Residency, you would want a trained professional on your side.
Paul Immigrations Reviews: The Application Process
For your SPR application, we recommend working with the immigration experts at Paul Immigrations. With over 15,000 satisfied clients these are the professionals that you can trust to not only prepare your submission correctly, but use their expertise to ensure your highest chance of success possible.
The team will walk you through the process, step by step, and ensure that you’re fully informed and comfortable along the way. These are the steps the firm will take you through to complete the process:
Step 1: You’ll start your process with an introductory phone call with your assigned Immigration Consultant (IC). They will ask you a series of simple questions to assess your eligibility for Permanent Residency status. They’ll gather information about your current status and affiliation in the country, as well as your age, length of stay and income.
Step 2: After your phone interview, the IC will schedule an in person interview. They’ll ensure that you have the correct work pass to move forward. Your IC will also sit down with you and explain the likelihood of success of your application, as well certain factors that may affect the overall process. Based off this consultation, you can then decide if you’d like to move forward with the service.
Step 3: Next, you’ll be given a list of which documents you’ll need to collect for the application. You can submit your documents in person with your Immigration Specialist (IS) or scan and email your documents online. These documents will include specific mandatory forms, as well as any additional documents that may help your case including information on charity work, community involvement, etc.
Step 4: Now that you’ve submitted all your documents you can let the consultancy take over the hard part. Your IS will assist in the completion of the form, based on the information you’ve submitted.
An in-house writer will write a personalized cover letter to exemplify your commitment to the Singaporean community and society. The well-established firm has a team of talented and experienced writers that specialize in creating persuasive cover letters that help you stand out from the crowd. This may include your participation in local events, your skill sets and contribution to the community. These will all help your chances of a successful application.
Step 5: After your Immigration Specialist reviews your form and the document proofs with a fine tooth comb, they will lead you through the steps to proceed with the online submission. Depending on a range of factors, the IS may guide you with the application remotely or schedule a time for you to come in where help is rendered personally to submit the application.
Note: The time between your in-person interview to the submission of your application will take an average of one to two months.
Step 6: The Immigration and Checkpoints Authority of Singapore (ICA) takes about four to six months to review each application. Whether it is approved or rejected, your IS will guide you on the next steps.
And there you have it! Six simple steps to your Permanent Residency status. Partnering with Paul Immigrations not only saves you the headache of trying to decipher every form and document needed, but it ensures that you’re sending in the best application possible. Having an experienced team on your side will give you the confidence that you’re doing all you can to improve your success rate. With something as serious as residence status and immigration law, you want to make sure you’re doing all you can to be prepared. Next stop – Singapore!
The following article was a collaboration between Don’t Forget To Move and Paul Immigration. As always, we would never recommend and promote a product or service we didn’t use or truly believe in.
The adorable town of Carmel by the Sea is the perfect stop on any California road trip itinerary. The one square mile village (yes, it’s that tiny!), is known for its fairy book houses, hidden courtyards and, of course, the stunning beach. But one of the lesser known reasons to visit Carmel is the town’s incredible culinary scene.
From the adorable coffee shops that have been in Carmel forever, to the newer trendy spots sporting cuisine from around the world, there’s so many incredible places to eat in Carmel. To help you out with your choices, we did some research for you (you’re welcome!). So without further ado, here’s your guide for where to eat in Carmel by the Sea:
Best Breakfast in Carmel by the Sea
You may have a complimentary breakfast at your hotel (we had a legit pastry spread at Hofsas House!), but it’s still worth venturing into town for a yummy breakfast. These are the best Carmel restaurants for breakfast:
Stationæry
Stationæry is one of those Carmel cafes that you probably wouldn’t find unless you were looking for it, or stumbled upon it while lost. Tucked back into one of the town’s tiny alleyways, this cute little cafe is perfect for a meal or a quick cuppa. Stationæry is popular with locals who come and sit with their dogs, chatting with neighbors who pass by.
The food is upscale (let’s be real, it’s not cheap), but the extra little touches and quality ingredients will make paying $14 for avocado toast worth the splurge. Their espresso drinks are delicious and served in adorable ceramic mugs.
The Tuck Box
The Tuck Box is a Carmel institution located in one of the historic Comstock cottages dating back to 1927. The restaurant was opened in the early 1940’s by two sisters from England and it still has an English feel to this day. They’re only open for breakfast and lunch, from 7:30 AM to 2:30 PM. The prices are super reasonable, and they have all the classics on the menu including the Tuck Box Benedict, waffle and omelettes. The Tuck Box also has a gift shop in the back where you can take a little souvenir to your friends back home.
Best Lunch in Carmel by the Sea
Whether you’re looking for a quick bite before exploring or you want to take a load off and enjoy a long meal, here are the best places to eat in Carmel for lunch.
5th Avenue Deli
If you’re looking for a quick bite to take with you on a beach picnic, 5th Avenue Deli is perfect. They have a full deli (well, duh), along with hot food like soup and a taco bar! They have all the little snacks you’d want with a picnic lunch (Kettle Salt & Vinegar please!), and a full range of beverages to take with you on the road.
They also have some tempting desserts if you’re craving a sweet. We got some sandwiches and potato salad to go (there’s no seating inside), and went around the corner to Devendorf Park. We enjoyed our sandwiches so much we came back the next day to grab a picnic for the beach!
Little Napoli/ Vino Napoli
We found sister restaurants Little Napoli & Vino Napoli while doing some research online. They’re right next to each other and both came highly recommended by locals and tourists alike! Little Napoli is more of a sit down spot and Vino Napoli more of a bar/restaurant. In the summer, you can sit in the patio between the two and enjoy a glass of cold white wine and a caesar salad. And in the winter we suggest sitting inside Little Napoli in front of their fireplace with a glass of red and one of their delicious pizzas. Or you can take advantage of the happy hour at Vino Napoli (3:30-6pm), with discounted drinks and pizza. Wherever you choose, don’t miss out on the famous garlic bread! It’s insanely delicious!
Brophy’s Tavern
This casual pub is the perfect place to cozy up for relaxed lunch in Carmel by the Sea. It’s a bit of an Irish pub meets sports bar, with plenty of televisions to stay updated on all your favorite teams at once. You’ll get your standard bar food here, including tasty fish and chips, yummy burgers and sandwiches. They also have a legit beer selection. Make sure you save room for dessert because their chocolate filled churros with chocolate dipping sauce are too good to miss!
Best Dinner in Carmel by the Sea
You’ll have no shortage of places to eat in Carmel for dinner. Whether you’re looking for one of the town’s classic older spots or one of the new restaurants in Carmel, here are our top spots for dinner.
Cultura Comida y Bebida
You guys – make us a promise now that you will not leave Carmel without visiting Cultura! This unreal restaurant serves Mexican (specifically Oaxacan) cuisine. On weekdays they open at 5:30PM, so this is definitely a dinner spot, but they do have brunch on the weekends. We highly recommend making a reservation, even mid-week, because the word has gotten out that this is one of the best restaurants in Carmel by the Sea.
Our favorite dish was hands down the queso fundido. They mix it at your table and set it on fire right in front of you to create the ooey-gooey melty cheese. They do a taco tuesday and a half-off wine Wednesday. They even do a late night menu until 12am (although who stays out that late in Carmel?!) The have a full bar with a wide selection of beers, cocktails and Mezcal, and of course, margaritas!
Flaherty’s Seafood Grill & Oyster Bar
You can’t visit the California coast and not have a delicious seafood dinner (unless you’re vegan/vegetarian, of course, then you do you!). And Flaherty’s is a great choice to indulge in some classic seafood dishes with a fun twist. What we loved about this restaurant is that while the food is gourmet, the ambience is relaxed and casual. We spoke with both the owner and the pastry chef, who are both super enthusiastic about their work.
We absolutely loved the lobster bisque and actually enjoyed everything we ordered! From the crab cakes to the crusted Halibut, every bite was delicious. We’re not oyster fans, but for those that are, they have fresh oysters delivered daily and prepare them every way you can think of- BBQ, Oysters Rockefeller and even stewed!
Pescadero
You didn’t think we’d stop with just one Mexican restaurant, did ya? If you know us, you know that we could eat Mexican food everyday. If you’re like us, Pescadero is definitely worth making a stop for lunch or dinner. The chef focuses on Baja cuisine, including Baja style tacos and ceviche, and on Wednesdays his mother comes in to prepare fresh Salvadoran pupusas. Next door the popular Barmel, which often has live music, and serves the full Pescadero menu.
Mission Ranch Restaurant
Carmel is famous for its quirky little facts, with one of the most well known being that Clint Eastwood was once the town’s mayor. This was only for a couple of years, back in the 80’s, but it’s definitely one of Carmel by the Sea’s claims to fame. People also love to visit the Hog’s Breath Inn, which Eastwood once owned. Now, the hip spot to check out is the actor’s new hotel and restaurant, Mission Ranch.
This inn and restaurant is about a mile out of town. If you bike or drive down the Scenic Highway, you’ll pretty much get spit out at the ranch. Inside there’s a piano bar that is often being played by one of Carmel’s musically talented locals. The restaurant is a cozy spot, but can fit quite a few people out on the back deck. If you sit along the railing at sunset, you’ll have a great view of the sun going down over the ranch. This is a real working ranch, so expect some normal ranch smells!
The food is straightforward (think Caesar, cob and wedge salads, as well as steaks, pasta and seafood), but while most dishes are simply, they’re really well done. The wine list has lots of local favorites and at super reasonable prices, considering the location and the famous owner. We definitely recommend a visit to Mission Ranch, at least for a sunset cocktail!
Best Places to Drink in Carmel by the Sea
What would a food guide to Carmel by without throwing in a couple of amazing places to wash down that delicious meal. Whether its a nip of wine or a cold beer, here are a couple of top recommended places to drink in Carmel by the Sea.
Blair’s Estate Wine Room
The Carmel/Monterey area may not be as well known as Napa for wines, but they are just as delicious. Blair’s Estate is a wine room in Carmel Plaza, an intimate wine tasting setting from a family run winery. The people who do the tasting are super knowledgeable about each wine.
Scheid Winery
Scheid Wine tasting room is another great spot if you’re looking for a tasty drop. You’ll like Scheid if you prefer more of a hands off approach to wine tasting. They have printed information about each wine, and the staff is there to answer any questions you may have, rather than walk you through each flavor. They also sell Lula’s Chocolates, a local chocolate maker, which pair beautifully with any red wine (or anything really!).
Sade’s Bar
Leave it to us to find the only dive bar in Carmel! We’re only half kidding, of course, by any other city’s standards, this is hardly a dive bar. It is a small, hole in the wall bar that fits maybe about 12 people max. Don’t expect any fancy cocktails here, and make sure you bring cash (they have an ATM). The small size of the bar gives it an intimate feel and means you’ll likely start chatting with the people sitting next to you. Sade’s is open until 2am, which makes it your best chance at nightlife in Carmel by the Sea.
This article was created in collaboration with LifeStraw, a company that we’ve always supported and purchased products from, years before we partnered with them. All opinions and thoughts are our own.
With the end of the year fast approaching (can you believe 2019 is almost over?!) it’s easy to get swept up in the consumerism of the holidays. But amidst the chaos of Black Friday, gift shopping and the drone of Christmas carols that seem to start earlier every year, there is one saving grace – Giving Tuesday. This international holiday that was started in 2012 is quite simply, a day that encourages people to do good. And if that isn’t the most genuinely heartwarming antidote to over-consumerism, then I don’t know what is!
The concept is simple: every year on the Tuesday after Thanksgiving, people, organizations and companies find a way to give back. Whether through donations, volunteering, acts of kindness or buying from social businesses, there are myriad ways to give on Giving Tuesday.
Real talk, though – it can get overwhelming. Just like Black Friday and Cyber Monday, you’ll probably get bombarded with ads from a lot of different organizations, looking for your support. And just like finding a good volunteering abroad gig, you’ll want to do some research to make sure your dollars are having a long lasting positive impact. That’s why we’re going to make this easy for you, and tell you who and why we’re supporting this Giving Tuesday.
LifeStraw’s Safe Water Fund
If you’ve been following our blog for a while, you know that we’ve been singing the praises of LifeStraw products long before we partnered with them on their giving back program. LifeStraw not only produces super useful water filtration products that will keep you from getting sick abroad, but they are committed to their mission of providing safe drinking water to those in need. I’ve said it before and I’ll say it again, this company walks the walk. They use innovative technology and design, paired with strategic planning and distribution to provide the developing world with every human’s most basic need, water.
Growing up in the Bay Area in California, I had the privilege of never having to think twice about where my drinking water would come from. Go to the kitchen, grab a glass, get water from the sink. It’s so easy that we forget that millions of people around the world do not have access to safe drinking water. 844 million people to be more precise. That’s over twice the US population, all without regular access to water that won’t make them sick.
What’s perhaps most frustrating about this issue is how preventable it is. Filtration devices like the LifeStraw products are proven to filter out bacteria, parasites and life-threatening illnesses. In fact, LifeStraw’s parent company, Vestergaard, is responsible for helping to reduce Guinea worm disease from 3 million cases in the 1980’s to only 25 in 2018 with the use of a simple pipe filter. In the next few years, this will be the first disease to ever be fully eradicated without a vaccine. The power of this technology is undeniable.
Where Your Donation Goes
So now that you know the impact of providing safe drinking water, what can we in the developed world do about it? Great question! This Giving Tuesday, LifeStraw is putting the call out for donations to their Safe Water Fund. This fund is a 501c3 that runs high-impact water programs, including providing safe drinking water to school children and disaster-impacted communities.
We’ve been fortunate enough to tag along on one of these programs as journalists to document the efforts. Last year LifeStraw used funds from its give back program, and donations from the Safe Water Fund to visit Chiapas, Mexico, delivering community water filters to schools in vulnerable communities. We visited rural schools with large indigenous populations.
I’ll never forget a visit to our last school in the mountains. A flurry of children dressed in colorful Mayan clothing swarmed our team as we delivered the filters. After the LifeStraw presentation on the importance of washing your hands and drinking safe water, we were shown the school’s water source. One of the teachers compared a cup of unfiltered water vs. the LifeStraw filtered water. There was a stark difference. I should note, that just because water appears clean doesn’t mean it’s safe to drink, and by the same token, just because water is a bit murky doesn’t mean it’s unsafe to drink. But the drinking water that had not been filtered had visible organisms wiggling around. It was unsettling to think that this had been their only water source until the LifeStraw filters had arrived.
This year LifeStraw went back to Mexico and used the Safe Water Fund to deliver filters in Mexican migrant centers near the US border. Working with the Department of Health, LifeStraw conducted visits to migrant centers in Juarez to assess needs on the ground. These centers are currently overfilled, many with migrants who arrived with the caravans that came north from Central America in February of 2019. These centers are mostly makeshift shelters created in churches, and are vastly under-equipped.
One of the most dangerous cities in Mexico, Juarez is plagued with violence. Delivering equipment to these extremely vulnerable communities is no easy feat, but the team was able to bring 8 LifeStraw Community filters to 6 different locations. With them, they also brought much needed goods like diapers, clean sheets and other sanitary items to the centers, including one LGBTQ+ center. You can read more about LifeStraw’s experience in the migrant centers here.
How to Donate
After doing extensive research and visiting the programs firsthand, we have no doubt that the Safe Water Fund is a deserving recipient for Giving Tuesday. One of our favorite things about donating to the Safe Water Fund is that you get to choose where you want your funding to go. We know that everyone has a cause that’s close to their heart. You can choose between programs like donating to give a mom and her new baby access to safe drinking water, as well as malaria prevention. Or give safe water to victims of disaster relief. Or you can donate to give safe drinking water to school kids all over the world. Each project is meaningful and will have a long lasting impact on these vulnerable communities.
Support the Safe Water Fund and choose the project that speaks to your heart by clicking here.
Let’s face it, when a town gets put on the map for tourism, it tends to change things. It’s the catch 22 of being a traveler – you want to visit amazing places, but you want everyone else to stay home! That’s why we were amazed that the tiny town of Carmel by the Sea has been able to maintain it’s small town charm, despite being a requisite on every California road trip itinerary.
It may be the secret courtyards and passageways, or the Comstock cottages akin to Hansel and Gretel that give Carmel by the Sea it’s unmissable fairy tale quality; whatever it is, one thing’s for sure, you’ll never find another place quite like it. And despite its tiny size (one square mile!), there’s so much to see, do and eat in Carmel. If you’re like most visitors and you only have a couple of days in the area before jetting north to San Francisco or south to Santa Barbara and beyond, you’ll want to make the most of your trip. Here are our suggestions for where to stay, eat and what to do in Carmel by the Sea.
Where to Stay in Carmel by the Sea
Tourism is the main industry in Carmel by the Sea, so there’s no shortage of inns and hotels. We hopped on Orbitzto check out which hotel in Carmel would be best for our mid-week stay We always search for hotels using Orbitz because we get 5% back in “Orbucks” using the Orbitz Rewards Program! 1 Orbuck = $1, which you can then use for discounts on over 350,000 hotels! And the more you book, the more you unlock rewards like complimentary breakfasts and free TSA pre-check!
When searching for hotels in Carmel by the Sea, we knew we wanted to stay at local independent inn, and wanted something cozy and unique. Scrolling through Orbitz we found the perfect spot, Hofsas House! Only a few inns are still family run in Carmel, and Hofsas House is one of them! This adorable inn is Bavarian themed, which is perfect for the European flavor in Carmel.
The women who own and run the inn now are a mother and daughter team, and the inn was opened by the grandmother. The architecture and decor of the building feels like you stumbled out of California into a cute little German town; you half expect someone to walk out of the lobby in lederhosen! They even have a mural of Bavarian dancers on an outside wall that was painted in 1957.
The 38 rooms are all different, with unique little amenities. We stayed in the Deluxe King. We loved opening our windows in the morning to an ocean view, and curling up in front of the fireplace at night. Yep, we had a wood burning fireplace in our room! It was perfect to keep us warm on the chilly October evenings. Carmel by the Sea really doesn’t have much in the way of nightlife, so you’ll probably find yourself back in your room after dinner. Curling up in front of the fire with a glass of wine and old Doris Day movie (a former resident of Carmel!) is the perfect way to end the day.
Our room also had a kitchenette with microwave, coffee maker, sink and fridge. Having somewhere to heat up leftovers means you can order an extra dish or two at one of Carmel’s incredible restaurants!
Besides it’s unique rooms, Hofsas House has one of the only heated pools in all of Carmel by the Sea! This is such a treat because the town can get chilly from the sea breeze. When you’re done with the pool you can duck into the adjacent dry sauna and relax. It was awesome to basically have a day spa inside our hotel!
One of the best parts of Hofsas House is the continental breakfast they serve every morning, complementary to all guests. Head into the lobby in the morning to grab a mug of coffee and a fresh baked Danish. Take a seat in front of the fire and Carrie, or one of the other staff, will sit down with you and help plan your Carmel itinerary. They have the best insider knowledge about unique places to visit, quirky activities and delicious spots to eat.
Where to Eat in Carmel by the Sea
Whatever your taste or budget, Carmel has got you covered for restaurants. You won’t find any big name restaurants or fast food like McDonald’s. Instead there are scores of restaurants, some large and elegant, others some tiny and casual, tucked away in the hidden alleyways that Carmel is famous for. There are a few that you definitely don’t want to miss.
Vino Napoli / Little Napoli– When we first arrived in Carmel in the afternoon, we were stuck in that awkward time between lunch and dinner when some places shut down. Luckily for us, Vino Napoli was not only serving food, but it was happy hour! Little Napoli is authentic Italian restaurant and it’s sister bar/restaurant, Vino Napoli, is right next door. Both are super cute. If you’re looking for a dinner spot, we recommend eating at Little Napoli (in front of the fire on a chilly night and on the patio in the summer!), but for our short snack (and our inability to turn down a happy hour deal!) we decided on Vino Napoli.
Vino Napoli has a great selection of wine, and their food is incredible! We had a pesto pizza and their world famous garlic bread. Do yourself a favor and do not miss this garlic bread. They serve it with a delicious marinara sauce. You will not be disappointed!
And the best thing about Vino Napoli and Little Napoli is that they’re both part of Orbitz Rewards Dining! You know we love a deal, and this is too good to pass up. If you’re not part of the Orbitz Rewards Dining program yet, it’s super easy to set up! You just have to register your credit or debit card (it’s free!), dine out at one of over 10,000 participating restaurants/bars and you’ll get 5% back in Orbucks to redeem on hotels!
If you love to travel you’d be crazy not to take advantage of this deal. Is there anything better than earning cash back toward your next trip, while eating delicious garlic bread? I don’t think so!
Flaherty’s Seafood Grill & Oyster Bar– Another Carmel institution that was recommended to us was Flaherty’s Seafood. Ken, Flaherty’s owner, is passionate about seafood, so the restaurant buys their fish fresh daily. The lobster bisque is a must have; it’s so creamy and delicious! We had the crab cakes and crusted halibut with vegetables and gravy. Everything was super tasty and the service was incredibly friendly.
Flaherty’s also has a great wine list with lots of local drops (I loved my Scheid Sauvignon Blanc) Then we finished off with the Olallieberry Pie (a la mode, of course!) It’s a perfect first dinner in Carmel if you want a casual environment with gourmet food.
And, of course, Flaherty’s is also on the Orbitz Rewards Dining list! I mean, if you can have your Olallieberry Pie and get 5% rewards back too, why would you go anywhere else?!
What to Do in Carmel by the Sea
For such a small town, there is actually tons to do in Carmel by the Sea. Here are some of our favorite activities to do in Carmel:
Renting E-bikes
Yes, Carmel is a walking town, but that hill coming back up from the beach can be a struggle at the end of a long day. Renting an electric bike is the perfect way to make sure you can cover enough ground to see everything. We stopped by Mad Dogs and Englishmen to grab a couple of super cute vintage looking cruisers.
Then we set off for the beach and rode along the Scenic Highway. The road hugs the coast and because it’s one way with a 15 mile speed limit, it’s super safe to share with cars. The views are stunning and there’s plenty of places to pull over for photos.
If you have more time, you can take the bikes all the way to Point Lobos, Pebble Beach or do the 17 mile Highway.
Wine Tasting
Although Carmel by the Sea may not be as famous for wine tasting as nearby Napa or Sonoma, it’s definitely worth doing in the area. The wine from Monterey and Carmel is just as delicious as its more famous neighbors, but the tasting rooms are more intimate and cozy. We popped into the Blair Estate Tasting Room in the Carmel Plaza for a taste. The woman who helped us was super knowledgeable and friendly. It felt like tasting wine with an old friend. Pro tip: The Cheese Shop is right across the way from Blair. We also enjoyed our tasting at Scheid winery just up the street. They’ve converted me into a Pinot Noir drinker!
Whatever you choose to do in Carmel by the Sea, you won’t be disappointed. This scenic little town is beautiful at every time of day, at any time of year and from any angle. You could spend the day doing nothing but wandering around tiny streets and strolling along the coast, and still have the perfect trip.
California Road Trip Planner
Here are some other stops and hotels you may want to consider adding to your California road trip itinerary.
Santa Barbara – If you loved Carmel by the Sea, but want a little more action, head down south to Santa Barbara. It has a similar old school charm to Carmel, but it’s much larger and has way more nightlight.
We recommend a stay at Franciscan Inn & Suites. This gorgeous Spanish mission-style hotel is perfect for a Santa Barbara getaway (another must-do on your California road trip itinerary!). Just a four minute walk from Santa Barbara Harbor, Franciscan Inn & Suites has a pool, free breakfast and big cozy beds!
San Francisco – If you’re heading north from Carmel by the Sea, San Francisco is only a 2 hour drive away. The City by the Bay has plenty of famous sites to check out, including the Golden Gate Bridge, Alcatraz and Fisherman’s Wharf. But make sure not to miss out on the city’s lesser known hidden gems like the Japanese Tea Gardens, Dolores Park and the Sutro Baths. Hotels are notoriously expensive in SF, but there are some great deals on Orbitz. Hotel Union Square has consistently good discounts and an amazing location just steps from Union Square.
Calistoga – After San Francisco head north by an hour and a half into wine country. Napa may be closer to SF, but we recommend visiting Calistoga instead. This cute little town has more of a local feel, but the quality of wine tasting and restaurants is as good as any big city. We always recommend staying at Brannan Cottage Inn, the historic inn where we got engaged.
Although fairly small in size, San Francisco is one of the most photogenic cities in the United States. With such a variety of diverse neighborhoods, this city has something for every type of photographer. Whether you prefer sweeping vistas of the cityscape, urban photography on the gritty streets or natural landscape shots, SF has ya covered. But the sheer amount of potential photo ops make finding the best San Francisco photo spots somewhat difficult.
Best Places to Photograph the Golden Gate Bridge
If you try to run around and capture every part of the city in one go, you’ll be exhausted. That’s why we recommend you stick to one neighborhood at a time. Once you’ve chosen your ‘hood of choice’, you can start to do your research and find unique and exciting locations to photograph.
Use blogs, Instagram and local forums to find all the best locations, as you compile your list of places to photograph. When you arrive at the location it will help you save time and allow you to have shot ideas already formulating.
Whenever we’re planning a photo day, we always make a list beforehand of places that look interesting in that area. This has saved us so much time in finding beautiful San Francisco photo spots.
This sort of planning was exactly what led us to discovering photo spots in one of the city’s prettiest neighborhoods: the Presidio. The Presidio is located on the city’s northernmost side, where the Golden Gate Bridge connects to SF. It’s a beautiful neighborhood full of pine, cypress and eucalyptus trees that enclose trails leading up to some of the most beautiful views you’ll find in the city. The Presidio was actually a former US military fort and you can still find artillery batteries hidden in the neighborhood that were used in World War II.
Finally, you have the magnificent coastline. All of these gems make the Presidio an amazing San Francisco neighborhood for photography. That’s why we chose to make it the meeting point for our SF photowalk. We had a beautiful day walking around the neighborhood. Here were our favorite Presidio photo spots, including advice on how to shoot at each one.
San Francisco Photo Spot 1: Baker Beach
When you pull up to Baker Beach, you’ll know why this is a favorite with locals and tourists alike. This stunning beach has a beautiful view of the gorgeous houses of Sea Cliff on one side and an epic view of the Golden Gate Bridge on the other. The sand is relatively soft and the water is clean (but super chilly!), making it a lovely spot to relax for the afternoon ifKarl the Fog hasn’t rolled in. This is a beautiful beach to photograph, whether it’s a long shot of all the families with their umbrellas posted up on the sand or the white sailboats contrasted against the deep blue water, you’ll definitely find a beautiful shot here.
Word of warning: The section of the beach closest to the rocks is a nudist beach. You’ll find your fair share of naked men there enjoying the sun’s rays to the fullest. That end of the beach also has the best views so you’ll find a mix of clothed and non-clothed people. Feel free to express yourself as you wish, but be respectful when taking photos in this section.
The rocks on the end of the beach make a beautiful viewpoint for taking photos of the bridge, but it can be a super busy area of tourists waiting for their turn to take a selfie with the famous backdrop. We recommend waiting to take your bridge photos at a different spot, which we’ll reveal shortly.
SF Photo Spot 2: Tree Clearing Near Trail
From Baker Beach you’ll walk up the trail toward Battery to Bluffs trail. On your way up, there will be an area of land to your left where you can veer off the trail. We normally don’t condone going off trail, but there is no sensitive habitat here, only dirt. From here you’ll be able to see the top of bridge peeking over the green hills.
This may not be one of the “normal” San Francisco photo spots, but it’s good to try something different. Taking photos of iconic landmarks like the Golden Gate Bridge can be difficult because so many people take the same photos from the same location and angle. If you want to stand out, you really need to find a different perspective to bring to the shot.
We love the view of the bridge from this spot because you rarely see a photo where this famous site is partially hidden. If you walk all the way down the path to the dirt landing you’ll see a group of trees that provide a beautiful frame for the bridge and green hills. This is definitely a spot people walk right past.
SF Photo Spot 3: Top of the Sand Ladder
If you continue up the path you’ll see another turn off to your left with a sign that says “Land of Abundance” with information on the local plant and wildlife. This is the top of the infamous Baker Beach Sand Ladder, a steep walkway that comes up from Baker Beach. As you admire the view from up here, you’ll notice people huffing and puffing up the Sand Ladder completely out of breath at the top. Our photowalk attendees were very grateful we didn’t take them up the ladder.
Not only is the view of the ocean and coastline stunning from up here, but the walkway leading down makes for an interesting shot. We shoot a lot of portrait photography and always keep an eye out for interesting features that can frame a person. This walkway may not be perfectly symmetrical but it provides for a natural focal point in a photograph. Jules took photos using continuous burst mode of me walking down the path. This allowed for me to walk naturally instead of taking a single shot of myself taking a posed step down.
SF Photo Spot 4: Battery Crosby
With a little bit of research we were able to find Batteries to Bluffs, a beautiful trail that winds up and down the bluffs with stunning views of the water. To get there, go back on the main path that follows Lincoln Boulevard you’ll keep walking until you see a sign for the Batteries to Bluffs trail on your left. Walk down and you’ll make it to Battery Crosby. This battery was built in 1900 to protect underwater minefields near the Golden Gate. Now, its an abandoned battery but its still a really interesting relic of the time.
It may seem like a visual eyesore compared to the natural beauty of the coast, but it can be fun to challenge yourself to bring out the beauty in “ugly” landscapes. This is the closest you’ll get to urban exploration photography on this walk so you may as well try your hand on shooting the building’s unique architecture. There really is a unique beauty in the overgrown grass carpeting the concrete steps. Recently someone spray painted “Life is beautiful!!” on the side of the battery just under the view of the Golden Gate Bridge. It may be vandalism, but it makes for a pretty awesome photo.
SF Photo Spot 5: Marshall Beach
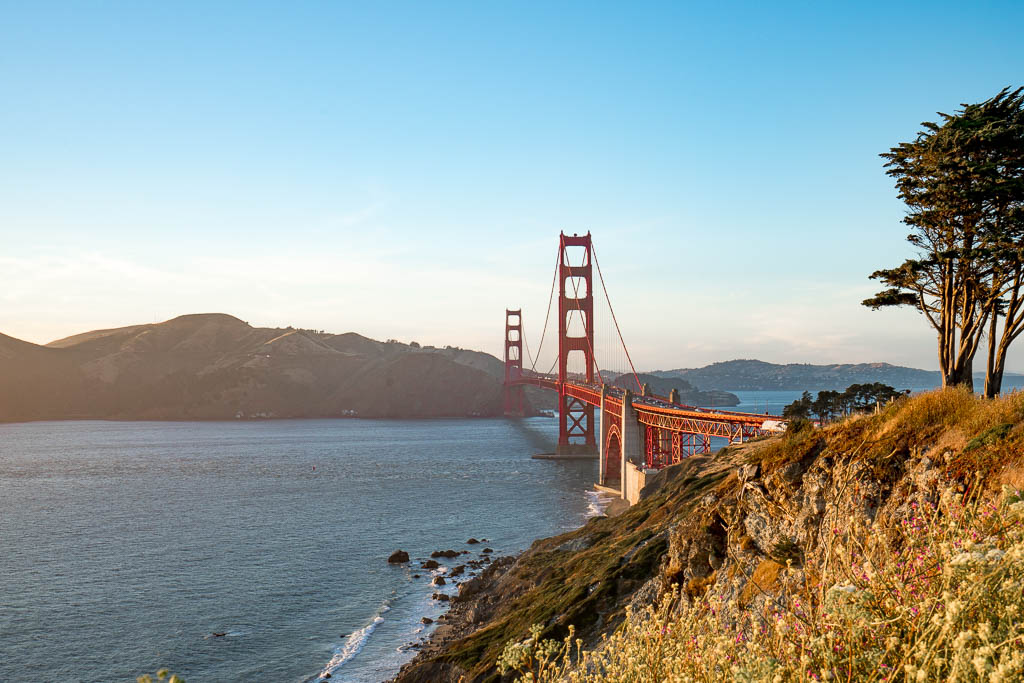
If you continue walking up the trail to the left of Battery Crosby you’ll walk along the top of the battery and out to the trail leading down the water. This is where you’ll find the best views of the Golden Gate bridge and, in our opinion, one of the best San Francisco photo spots. This trail is part of Batteries to Bluffs and it can get a bit busy, especially on the weekends. But if you have patience you’ll be able to get a perfect shot of the bridge and the stunning coast below. Continue down to the trail and you’ll find a big rock just off the trail where you can take really nice portrait shots. As always, be careful where you walk/stand! Always make sure you’re in a safe, stable place before taking photos. A travel photo is not worth risking an injury or your life!
We ended our photowalk here because you’re not going to find any Presidio photo spots better than this. It’s a truly gorgeous view of the Golden Gate bridge and on a sunny day you can see how it stretches across the bay into Marin. An iconic sight in one of the country’s most photogenic cities!
If you’re in the San Francisco Bay Area, let us know if you’re interested in an upcoming photo walks in the city!
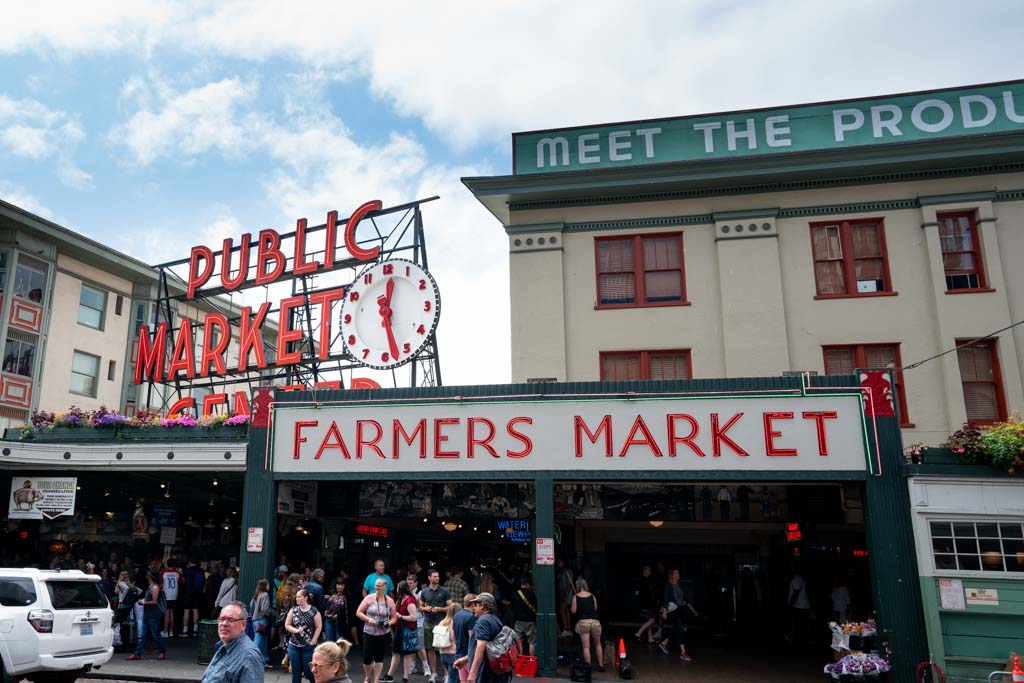
Visiting Seattle and not visiting Pike Place is like skipping Central Park on a visit to NYC; you just don’t do it! This bustling waterfront market is a Seattle staple. But you may be asking yourself, what can we do at the Pike Place market? It’s a super busy market that is filled with stands from food producers, fresh flowers and local artists. It’s often packed and can be a little difficult to navigate if you don’t know where you’re going.
That’s why we decided to do a Pike Place market self guided tour, using tips and recommendation from local friends, to help you plan your next trip! Here were our favorite things to see at Pike Market:
Pike Place Fish Throwing
Perhaps one of the most well known “attractions” at the market is the famous fish stand. If you’re entering the market under the famous Public Market Center sign, the fish stall will be straight ahead of you. At first glance it may just seem like one of the many seafood stands with fresh fish and shellfish. But if you wait around long enough you’ll notice a crowd start to form and eventually the workers will start hollering. Then they’ll take a fish and throw it back and forth from the iced display to the inside of the counter and back again.
There’s not much else to it, but it’s actually pretty fun to see them throwing a big fish around. The first time I went to the market they only threw the fish when someone actually ordered one. But the second time we went there was a camera crew filming behind the counter so they did the whole big shebang. There doesn’t seem to be any specific fish throwing time at Pike Market, so if you want to see one, you’re best bet is to order a fish yourself! They ship so you don’t have to carry a smelly fish on the plane.
Famous Pike Place Pig
This is an easy stop on your self guided walking tour of Pike Place market. The bronze pig statue is in front of the fish stand, to the left. If you go on a busy day (which is pretty much everyday at Pike Market), the pig will probably be hidden by a swarm of tourists plopping their child on top for a photo. The pig is named Rachel and she’s actually there for a good cause. She’s a giant piggy bankthat takes donations for various causes and has raised over $200,000 since 1986. Apparently if you rub her snout and make a donation you’ll be blessed with good luck!
Rachel has a cousin named Billy who lives on the other side of the market near the water. He’s also a piggy bank, although as my friend pointed out during our last visit, not as famous as Rachel. If you’re looking for a less crowded photo opp, or just want to give the under dog some love, pay Billy a visit!
Looking for some more USA travel inspiration? Check out our United States collection of articles!
Pike Place Market Gum Wall
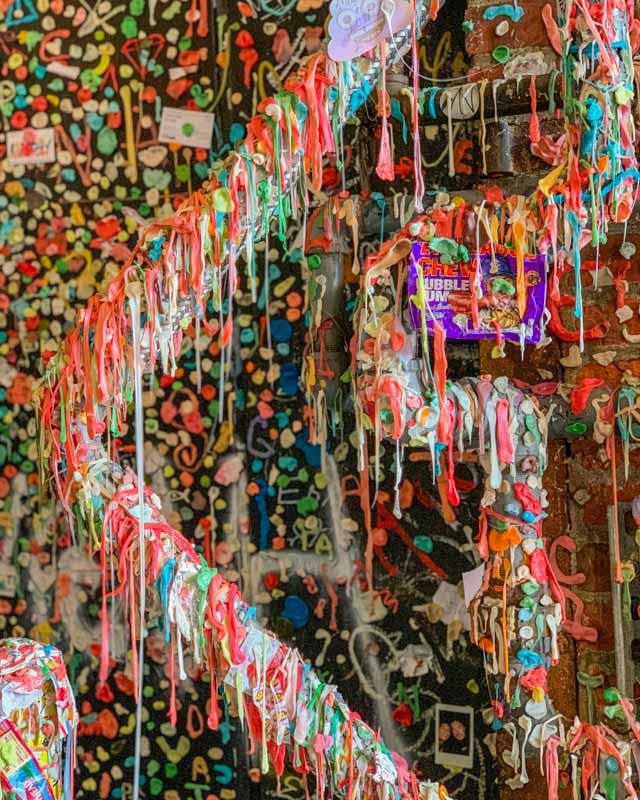
This next spot at Pike Place Market may not be everyone’s jam. We may even get chewed out for including this one our list. It’s the gum wall! The wall is actually an alley that can be difficult to find, but ask anyone about it and they’ll point you in the right direction. This little alley is literally covered in gum that visitors have stuck to the walls. Cool, disgusting, a bit of both? Whatever you think of it personally, it’s definitely worth a visit to see in all its sticky glory.
The history of the gum wall is that the theater down the street had patrons come by after showings and stick their gum on the wall (I guess gum is the theater snack of yore? I’ll stick with popcorn, thanks!). Theater employees would come by to scrap the sticky mess off, but it became so common they gave up. Now the gum wall is a fully fledged tourist attraction. So many people stick their gum on the wall that the city has to come by every few months and scrap it clean, otherwise it would literally take up the whole alley. Stop by and add your piece, but don’t get too close to the wall or you could end up in a sticky situation!
Piroshky Piroshky Pike Place
After walking through the market you’re bound to work up an appetite. There is no shortage of places to eat around Pike Place Market and you can find tons of recommendations online. If you want a quick snack instead of sitting down to a long meal, stop by Piroshky Piroshky. They have the best, well, piroshky!
If you don’t know, piroshky is an Eastern European/ Russian pastry which is stuffed with fillings like meat, cheese, potatoes or vegetables. There is usually a line out the door but it goes fast. They are in high demand so they keep making new ones fresh out of the oven. We recommend the cheese and potato piroshky or the smoked salmon piroshky. Both are delicious!
The Pink Door Seattle
Thank goodness we’d already heard about this restaurant, because otherwise we may have walked right by it. The entrance is just a light pink door built into a windowless wall on Post Alley. Word of warning, the door is not bright pink. It’s more of a muted blush color, so don’t visit if you’re hoping for a colorful Instagram photo.
Instead, go inside for a fun bar/ restaurant that has nightly entertainment like music, cabaret and even a trapeze swing that flies over the tables. In the winter this a cozy fun spot for a hot toddy or Irish coffee. In the summer, their back deck is the perfect place to enjoy their signature summer cocktails (I was obsessed with my fresh watermelon margarita!)
Ellenos Greek Yogurt Pike Place
If you want a little post meal sweet treat, we definitely recommend grabbing a flavored greek yogurt at Ellenos. This little stand is across the street from the market not far from the Public Market Center sign. They have tons of flavors. Our favorites were passionfruit and creme brûlée. This shop is a favorite amongst locals and we found out about it from a friend who lives in Seattle. We’ll definitely be recommending this to others!
The following post contains affiliate links. Clicking the links helps provide a small commission to us, at absolutely no extra cost to you! It’s a little way we keep our site running and would never recommend a product we didn’t personally use or wholeheartedly endorse.
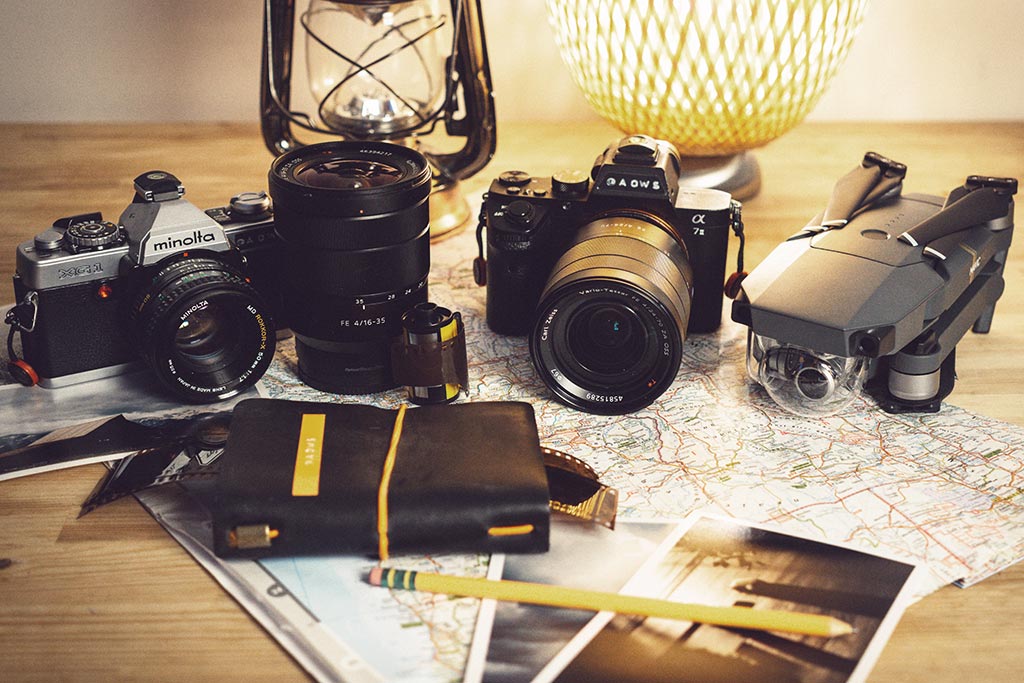
Over the last ten years we’ve probably gone through more cameras and photography equipment than the average traveler. Aside from being part of our job, we’re always testing out the best equipment to take on the road. From drones and hand held gimbals, to action cams and mirrorless cameras, we’ve tried it all!
In the following post we’ve compiled a list of our favorite and best cameras for travel, blogging and vlogging:
Best Mirrorless Cameras for Travel
The days of heavy, expensive DSLR cameras are gone, as more and more camera companies release their own versions of lighter and cheaper mirrorless cameras. With the same full-frame, interchangeable lens benefits of a DSLR, mirrorless cameras are changing the game for travel photographers. In the past we were big Nikon users, but have slowly been changing that out.
Sony has been a pioneer in the mirrorless camera field over the last 5 years, but Nikon, Olympus, Panasonic, Fujifilm and Canon have been leading the charge to keep up and surpass them. As more and more camera models come out, each bettering their previous model, it can be hard to know where to start.
Sony a7Rii
We first bought the Sony a7Rii back in early 2016. We’d just finished filming our Travel Channel tv show pilot and had a bit of extra money floating around, so we decided to reinvest it back into our business. It was the first full frame camera we’d ever purchased and we went big! Looking back now it was probably one of the best investments we’ve made for our blog. Spending almost $5000USD for the body and a couple of lens we suddenly took our photography game to a new level.
But it wasn’t just the camera that made us better photographers, it was also the time we spent learning how to use the camera. We went beyond understanding how to shoot on manual and took advantage of the amazing features this camera had to offer. Shooting at a ridiculous 42.4-megapixel, the Sony a7R series is the perfect camera for travel photographers looking to step up their skills. Built in image stabilization, fast auto focus, dynamic range and so much more!
Still learning how to use your camera? Get2 FREE months on Skillshare for access to amazing tutorials and classes on photography, photo editing and more!
While the Sony a7Rii might have been released in 2015, it’s still an incredible camera. As it’s an older model, the price to purchase this camera is now really reasonable if you want to improve your photography. Granted, if you’re not already shooting with Sony, you’ll need to update your lens as well, but it’s a worthy investment. The newer Sony a7Riii model offers a few slight improvements, but nothing $1000USD is worth in our opinion.
The Sony a6000 has been a favorite camera of ours for a long time. We’ve loved this camera so much that we purchased three of them, but not all at the same time. Long story short, when they go missing on your travels, it’s always good to havetravel insurance to ensure you can replace them! Christine first purchased this camera back in 2014 when we started to switch our gear over to Sony and embrace the benefits of mirrorless cameras.
Three cameras and five years later we’re still recommending this as a fantastic camera to take on your travels. It’s an APS-C crop sensor, so it doesn’t have the same photography capabilities as the Sony a7 / a9 series, but for a quick, sharp and light travel companion it can’y be beat. And at its current price point of $600ish dollars with a lens it’s amazing value for what you get.
Since the Sony a6000 was released there have been some big developments with the a6300 and a6500, but the price starts to climb as you look at each model. For the time being if you’re looking for an easy camera to take on your travels then you can’t go past the a6000 or a6300.
The last five years have seen a huge shift in the commercial and recreational drone space. Tech giants like DJI have paved the way for all levels and abilities and have well and truly earned their spot at the top. Not only do they make the best products, but they’re pioneering changes and advancements at a rapid rate.
When it comes to buying a drone for travel there are two main factors to consider, size and quality. Like a lot of camera equipment, the bigger it is, usually the more functionality and quality they’re going to have packed into it. So choosing a drone comes down to three choices based off size: the Phantom, the Mavic and the Spark.
DJI Phantom 4
This was the first drone version we bought back in late 2015, a DJI Phantom Pro 3. Since that time the Phantom has seen some incredible developments in picture quality, sensors and battery life. The Phantom is the bulkiest of the three options, but it also has the best stability in the air. Because of its larger propellers, motor size and body design it is less affected by wind and hovers better in the air. The newer Phantoms also have an enhanced camera sensor, which means they take a clearer and more detailed picture.
We traveled all around the world with our DJI Phantom drone and it served us well throughout the US, Mexico, Colombia, around Europe and back in Australia. The only downfall when traveling with a Phantom drone is the size. I had to have a dedicated backpack carry on just for the drone and remote.
Technical Stuff
One inch 20-megapixel camera sensor
Captures RAW and JPEG images
Shoots 4K at 60fps up to 100mbps bitrate
Dual rear vision sensors and infrared sensing system for obstacle avoidance
The next generation of drones from DJI really changed the game. Introduce the Mavic, a drone that had foldable arms and took up less than half the size of the Phantom. Plus the remote was also half the size, making the DJI Mavic every travelers ultimate companion. Over the last couple of years the Mavic has seen huge improvements to its design and capabilities, but not its size.
The latest Mavic 2 Pro has a whopping 20-megapixel one inch CMOS sensor, as well as an adjustable aperture and the ability to shoot 10-bit HDR video. Ok, that all sounds a little bit technical, but just know this, it’s a darn good camera strapped to this tiny foldable drone.
After lugging our Phantom around for a couple of years we decided to upgrade to the Mavic Pro at the end of 2017. We’ve since taken it all over the United States, Australia, Guyana, Mexico and Southeast Asia. In the same drone bag that used to be dedicated to carrying just the Phantom and remote, now fits the Mavic Pro, remote and all our DSLR camera equipment. We’ve essentially quartered the amount of space that the DJI Phantom took up.
Quality wise the Mavic has been great. In very windy days, or when you’re really making it work, the Mavic doesn’t quite hold up as well as the Phantom, but at the expense of its compatibility it can not be beaten as the best drone to travel with.
Technical Stuff
One inch 20-megapixel CMOS camera sensor Hasselblad camera
The newest addition to the DJI drone family is the tiny DJI Spark. This drone, with it’s much cheaper price point and ease of use, is definitely marketed at entry level drone users and photography enthusiasts. It has all the signature DJI technologies, but in a much smaller version. So small you could even fit it into your jacket pocket, but with that extreme reduction in size comes some loss in functionality.
While you may benefit from being able to literally carry the DJI Spark around in your pocket, you do get some limitations compared to the more powerful models in the Phantom and Mavic. The DJI Spark has a much shorter battery life and transmission range, as well as a limited gimbal and image quality. That being said, the DJI Spark is a great, easy to learn drone to take on your travels.
From all reports the DJI Spark is a great addition to any travelers looking to buy a compatible travel drone, but, if you were looking for anything serious in regards to quality, it’s probably not the best choice. Because of the lightweight design the DJI Spark doesn’t have as good stability and is tougher to maneuver in the wind.
Technical Stuff
16min flight time
1.2 mile (2km) transmission range
2-Axis gimbal (means less stability on the camera)
For us the DJI Mavic wins this race! If Goldie Locks was deciding between drones, this one would be ‘just right!’ It’s the perfect combination of quality image, stabilization, size and price. If you’re looking to travel with a drone, the DJI Mavic is the best choice.
Best Action Cameras for Travel
Enter into the world of high paced, adrenaline junkie status with an action camera for travel. Take your shots to the highest highs and deepest depths with a durable camera that was meant to be a little rough around the edges.
While not completely necessary for everyone, traveling with an action camera gives you a lot more versatility when it comes to quick, on the go shots that involve water or heights. Strap a GoPro to your motorbike as you zoom around the Philippines or when you’re diving under waterfalls in Lombok, Indonesia.
GoPro
GoPro is a tried and tested, well known household brand in the action camera department. While they’ve had their crack at other aspects (R.I.P Karma drone), action cameras are where they really shine. And so they should, they’re the original creator of a rugged camera that could really push the boundaries.
We’ve been using GoPro cameras since 2013 when we had our first GoPro HERO2. We also had a HERO4, HERO5 Black and now have the HERO7 Black. Each new release has proved itself a worthy upgrade, as the GoPro cameras have improved their waterproof housing, camera quality, high-definition recording and image stabilization.
With the new HyperSmooth, this makes the HERO7 GoPro’s best camera yet! The image stabilization is unbelievable! I took this camera on my trips adventuring around Guyana, from ATVs and 4x4s to kayaking and horse riding, and the smooth video recording without a gimbal was incredible!
Move over GoPro, there’s another contender in town. Mid-2019 DJI announced to the world that that is was entering into the action camera arena and it did so with a bang! The DJI Osmo Action might look pretty similar to the GoPro HERO range, and that’s because it is. It’s got a watertight body, it’s own ‘RockSteady’ image stabilization system and shoots 4K at 60fps.
There is one key thing that sets it apart from the GoPro HERO, and that’s the frontward facing camera. Gone are the days of wondering whether you’re in the GoPro shot when taking a selfie, now the DJI Osmo Action offers a small screen at the front, so you can watch yourself in selfie mode. It sounds like a minor change, but it’s a game changer for action cameras!
Aside from that it levels up against the GoPro HERO7 pretty evenly in other technical specifications, but is also around $50USD cheaper depending on the marketplace you purchase it from. It’s a solid purchase and it’ll be an interesting battle to watch GoPro and DJI battle it out over the next couple of years.
Hold onto your hats, because the action camera space just got a new competitor! And here’s the first amazing thing to say about the AKASO V50 Elite, it’s less than half the price point of a GoPro or Osmo and just as good! Whether you’re a professional content creator, a hobby photographer or just someone who wants to document their trip, the AKASO V50 Elite jumps onto the scene with a bang. Containing all the same great features as the more well known brands, the AKASO V50 Elite offers 4K recording at 30fps and 60fps, quality image stabilization, touch screen, voice control and a super wide field of view.
The only difference between this device and the almost three times as expensive competitors is that it doesn’t have an in-body waterproof housing. So if you’re going to take it underwater you need the waterproof casing, which comes included. This means you lose the ability to use the touch screen under water and have to use the buttons, but it’s a small price to pay for the huge saving you get on this action camera.
In regards to quality the AKASO V50 Elite is just as competitive as the other cameras, especially for the unbelievable price! The 4K offers sharp quality video and with a bit of editing comes up sharp and professional. For anyone looking for great action camera on a budget, this is the one to pick!
Best Camera Tripods for Travel (Photo and Vlogging)
Whether you’re capturing epic long exposures our capturing a quick self on the go, a handy tripod is a must for any traveling photography enthusiast. From handheld and bendable tripods like a GorillaPod to more traditional, fixed tripods, here is the list for the best camera tripods for travel.
JOBY GorillaPod Mobile Rig
JOBY are the best in the business when it comes to tripods; providing easy to use and durable tools that make it simple to enter into the vlogging world. The GorillaPod Mobile Rig is a real game changer for phone or action camera recording, giving you access to multiple arms and mounts to rig up lights, camera and action!
With the trademark JOBY three prong, flexible wrapping legs you can set up the Mobile Rig just about anywhere. Set it up on the table, hang it from a tree or simply hold it in your hand. Or as JOBY like to say, Grip It, Wrap It, Stand It. The multiple mounts means you can have your phone set up (in landscape or portrait), as well as a secondary camera in the GoPro or lights. The GripTight camera mount has a secure locking mode that makes it easy to switch between viewing modes. The multiple mounts give you freedom and flexibility to add extra elements to your video, like lighting, a secondary camera and enhance audio. Whether we’re shooting from the road, or setting up an Instagram Live at home, this is our go to vlogging tripod!
Technical Stuff
Secure any smartphone in the GripTight mount
180-degree adjustable tilt for portrait and landscape mode
While the GorillaPod Mobile Rig is the perfect on the go tripod for a phone and action camera, when we need a little more lift we use our trusty GorillaPod 3K. As the name states, this blogging tripod can hold up to 3kg (6.6lgs) of weight, which makes it perfect for our heavier Sony camera.
With its trademark JOBY wrapping legs the GorrilaPod 3K is flexible and adaptable to any setting. It’s lightweight, sturdy and really easy to set up. We particular like the quick release attachment that makes it easy to set the camera up on the tripod or release it quick for handheld action. The GorillaPod 3K also makes it easy to vlog with when cruising around the streets.
This compact travel tripod is for those more stable shots when you want to control the height of your tripod and do longer exposures. The GorrilaPod tripods are great for on the go, but if you’re doing any kind of still work with a low aperture, then you’re going to need a really study tripod. We love our MeFOTO GlobeTrotter because its compact, lightweight and perfect for holding up our heavy DSLR and lens. It also comes in a range of colors to suit your style and environment.
When we told our family and friends that we were planning a trip to Nevada, the first reaction was “Awesome! So you’re going to Vegas?!” Nope! Las Vegas is definitely Nevada’s biggest name attraction, and while we love the occasional visit to Sin City, we were eager to see what else this beautiful state has to offer.
We chose Travel Nevada’s recommended road trip – the Lake Tahoe Loop. We were eager to do a Lake Tahoe road trip because we absolutely love the lake, but surprisingly had never visited the Nevada side. Besides the draw of the big blue, we were super excited to check out some of the old historical towns along the way. Genoa and Virginia City promised to be a step back in time and a glimpse into the wild west of the silver and gold rush.
During our 5 day road trip we saw an incredibly diverse landscape and did such a variety of sports you would think we’d visited all 50 states instead of just one. From kayaking in the sunshine, to pulling over on highway 431 to play in the snow, from mountain biking along the lake to climbing part way up a 14 story outdoor climbing wall, we never had a moment of boredom in Nevada. Here were our highlights from the Lake Tahoe loop:
Zephyr Cove
If you’re making your way to the Lake Tahoe Loop from California, you’ll probably schedule a trip to the lake for your first stop. Starting your road trip with a glimpse of the big blue will get you pumped for everything to come. We started the first leg of our journey at Zephyr Cove. This Lake Tahoe entry point is one of the first stops once you pass over the border into Nevada. Zephyr Cove has a marina, restaurant and camping resort. If you’re too bougie to sleep in a tent (no judgment, we’re van campers!), they also have cabins and airstreams for rent at the Zephyr Cove Resort.
Zephyr Cove is a popular spot with families, couples and groups who want a lively area to take in the lake with all the amenities they need around them. Zephyr Cove campground is just on the other side of the highway from the marina. And when I say highway, I mean a busy street. There is a stop light and crosswalk making it an easy place to stay to access the lake. You can rent stand up paddle boards, one and two person kayaks, jet skis and powerboats on the lake from Zephyr Cove Resort.
In the summer we definitely recommend renting some sort of watercraft (we loved the kayaks but thrill seekers may want to hop on a jet ski!) and cruise around the water. You can stop off at different beaches along the way to lounge on the sand or have a picnic. In winter, they do snowmobile tours which would be super fun, especially with the gorgeous surroundings! If you don’t feel like navigating your own vehicle (hey, you’re on vacation!), check out the M.S. Dixie, a sightseeing paddle wheeler boat that will make you feel like you’re in a Mark Twain novel.
We loved taking out a couple of kayaks and cruising around the lake, being able to stop off at the rock island and take photos of the water with the stunning snowy mountains in the background. It’s recommended to take water toys out in the morning while the wind is generally calmer. There’s a small bar and grill right by the water to grab a snack or drink while soaking up the sun for the rest of the afternoon. Parking in the Zephyr Cove Marina parking lot is $10 per vehicle.
Where to Stay in Zephyr Cove
We stayed at Zephyr Cove Resort and loved it! Obviously the location is perfect with its proximity to the lake, but it’s also just a super nice campground. The area is clean, well laid out and the bathrooms are really nice. Each site gets a bear box and a grill. It seemed like mostly families camping nearby, so it stayed quiet throughout the night.
Where to Eat in Zephyr Cove
Toast – Just a short drive (like literally 3 minutes) from Zephyr Cove Resort, Toast is an unassuming little restaurant on the highway. You can choose to eat in the bar or at the main restaurant, but for the latter you’ll want to make a reservation. We enjoyed eating the bar (it’s the same food), while watching a baseball game. The food is delicious. We especially loved their white fish and sun dried tomato polenta special. Yum! This would also be a great spot to bundle up with a frosty beer or a hot toddy as the snow falls outside.
Genoa
Genoa is so small you could drive through the whole town in about 90 seconds. But considering this town is Nevada’s first non-native permanent settlement, it’s definitely worth stopping to check out. Have a walk of the streets and duck your head into some of the shops to chat with the locals. There are a couple antique shops, a few small restaurants and the Genoa country store if you need some snacks.
One of the main sights in town is Mormon Station State Park. This settlement was originally founded in 1850 by a few rogue Mormons who came over to Nevada to make some dough. It changed ownership in 1851 and became an official trading post for Carson Valley. The park has a museum that costs $1 to enter, which is definitely worth checking out to learn more about the local history and see some historical artifacts. The people who run the museum are very knowledgeable and have some fun local anecdotes. Make sure to ask them about the curse that blows wind through Genoa.
Another fun stop in the area is the Genoa Trail System. The system has 16 miles of trails on which you can hike, run, bike and ride horses. They also allow dogs! There are a number of different loops you can take, which range from flat beginner walks to more challenging narrow trails with switchbacks and steep drop offs. If you want to take it easy, you can drive just a few minutes out of Genoa to the River Fork Ranch trailhead, which has free parking. From there you can do a couple different loops that take you through flat, if not a little muddy, grassland. If you’re up for a more challenging hike, look for one of the mountain trails in the area. The Jobs Peak Ranch Trail and Fay-Luther Trail both come highly recommended with beautiful views of the area!
When you’re visiting Genoa, you HAVE to go to the Genoa Bar & Saloon. Not only is this spot straight out of the wild west, it’s actually the oldest “watering hole” in Nevada! This saloon is a piece of history, so it would be downright disrespectful not to go in for a beverage. While you’re there have a look at the pamphlet that documents the history of the bar. Reading this thing is like going on a scavenger hunt. It describes historical artefacts that are hidden all over the saloon. You can play a game of iSpy and look for all the secret objects, from the trap door near the pool table to Raquel Welch’s bra hanging on the antlers.
There are wooden tables out the front of the bar if you want a slice of sunshine, but we recommend sitting at the bar to get the full flavor of the place. The clientele is a really interesting mix of locals and tourists. But the biggest demographic we found was people from out of state and out of the country who somehow found themselves in the area and just never left.
We met a Brooklynite cowboy who travels all over the country chopping down trees and has been coming to the bar for over 30 years. We met a Kiwi who traveled around Nevada and somehow never left Genoa. We even met a German who lives part time in Bora Bora, but comes back every couple years to draw the bar in his sketchbook (and does an amazing job capturing the lively scene!). It may seem like I’m going on and on about a simple old school saloon, but once you visit you’ll see for yourself why this place is one of a kind!
Where to Stay in Genoa
Genoa is pretty tiny, so your best bet is to stay in nearby Minden or Gardnerville. We stayed at the Carson Valley Inn Casino in Minden. It has an indoor pool and two indoor jacuzzis, which would be a blast to chill in while it’s snowing outside. They also have two onsite restaurants and a 24 hour casino!
Where to Eat in Genoa
If you’re looking for a full meal, or just a drink, we definitely recommend visiting the historic Pink House. This restaurant and charcuterie is right off the main street and you can’t miss it (it’s pink!). They have cheese and charcuterie boards, as well as full meals and wine and beer. The house dates back to 1855 and you can eat in the main dining room, on the wrap around porch or in the back patio.
Virginia City
If Genoa feels like a step back to the turn of the century, with its quaint buildings and small town feel, then get ready to continue your time travel in Virginia City. This historic mining town is known as the Richest City in the World, and rumor has it that the streets were once paved with silver (hey, they couldn’t all be gold!). In 1854 the gold rush was in full swing in Virginia City. These days it’s a tourist town, but it’s been so well preserved you can almost feel like you’re back in the wild west.
The town itself is not very big, but it’s so jam packed with shops and saloons that it’s worth spending a whole day here. The main street is lined with two boardwalks on either side. The shops have a mix of old Daniel Boone hats and toy pistols, as well as kitschy t-shirts and your typical souvenir magnets and stickers.
Train Tours in Virginia City
Besides the shopping, there are a few tours you can do in the area. We recommend taking a train tour. The Virginia & Truckee Railroad is a historic part of the town and it’s a great way to see the beautiful Carson Valley. The Virginia City to Gold Hill loop only takes about 40 minutes and costs $12 per adult and $6 per child. We recommend getting there a bit early if you want to take photos on board, because you can’t stay on the train after the ride is finished. The conductor will give information about the history of the mining boom in the area, mixed in with a few zingers and jokes that will make sure you’re entertained. The tour can feel a little hokey sometimes, and it’s definitely not a rip roaring railroad, but it’s a fun trip to learn about an important part of American history.
Pro tip: Sit on the opposite side of the train from the side that you enter on for a better view of the Carson Valley.
Things to Do in Virginia City
If railroads aren’t really your thing, or if you have time for multiple tours, check out the Old Washoe ghost tour. Virginia City is somewhat of a paranormal hot spot. The show Ghost Adventures has visited this site three times and has officially declared it haunted, at least according to their poster standing in the bar, on which they wrote “The Old Washoe club is haunted.” (Can’t argue with that!)
Apparently the show hosts captured a full apparition on camera! We asked the bartender if the place was really haunted and she said that she’s heard voices and seen people walking in the back when she knows the place is empty. According to the staff 5 spirits live upstairs, including a young girl who likes to move around her toys. Creepy!
But the Old Washoe Club isn’t the only spooky spot in town. Just down the road is the Silver Queen hotel where they’ve seen plenty of ghosts (Ghost Adventures has also visited here 3 times, so I guess they’re equal?) While we were there, a camera crew was upstairs with the resident medium and apparently they had 3 spirits enter the room, one of which cut the medium’s finger, which started bleeding.
Whether you believe in ghosts or not, the Silver Queen is a fun spot to check out. The bar serves cheap drinks and while you drink you can peruse the ghost photo album with alleged photos of spirits caught on camera. The hotel is also home to the oldest wedding chapel in Nevada! Move over Vegas, Viriginia City may be the real place to get married in this state!
Where to Stay in Virginia City
If you want to soak up the Wild West for a bit longer you can choose to stay overnight in Virginia City. There are a handful of old school hotels in the small center, but you might as well go all in and stay at the haunted Silver Queen. It’s not fancy, but rooms are affordable and if you spot a ghost you can snap a pic and put it in the haunted photo album. We’ve heard room 11 is the most haunted!
Where to Eat in Virginia City
Virginia City isn’t really a foodie destination (unless we missed something, in which case, please correct us!) It seems like there’s just a handful of touristy restaurants on the main street. Word to the wise, most of the restaurants close at 3pm until dinner, so if you’re planning for a late lunch, make sure it’s not too late. We heard good things about Virginia Jerky Co. but sadly even though their sign said they closed “around 4ish,” they were done and locked up by 3pm.
The Palace – We had lunch at the Palace, because they were open till 4pm. It’s a busy restaurant that gets crowded with tourists, but still keeps up good service and serves decently tasty food, even if it is a little cold. Expect what you get at most touristy restaurants that pump people in and out, one and done!
Grandma’s Fudge Factory – Not exactly your go to for a full meal (although we won’t judge you if you do!), but it’s worth stopping in for a block of fudge to take as a road trip snack. This old timey shop will give you free samples that will definitely hook you into buying a box. We can personally vouch for the peanut butter chocolate swirl and the mint chocolate.
The drive to your next destination, Reno, is a little under an hour, so if you’re not super hungry you could wait until you get to the Biggest Little City in the World, or stop off at Carson City on the way.
Reno
If you’ve ever wanted to have a James Bond moment, scaling a building over a famous monument (that’s what he does right? I’ve never actually seen a Bond movie), Basecamp at the Whitney Peak Hotel is for you. Not only do they have the world’s tallest artificial outdoor climbing wall, but it’s right above the famous Reno arch. It stands at 164 feet or 14 hotel stories!
But don’t worry, you won’t fall down to the sidewalk on some poor tourist who just came to get her gamble on and see the Rat Pack variety show. The wall starts on the second floor of the hotel and you’re safely strapped into a belay/belays (are there more than one? I’m not a climber). In fact if you want to scale all the way to the top you have to pass a safety test to make sure you know what you’re doing.
If you want to get your feet wet on something a bit less intimidating, Basecamp has an artificial bouldering section inside. You can rent shoes and test your Spiderman skills on shorter walls that range from vertical to basically upside down. They range from easy, medium and expert paths that are denoted with tape. Remember though, you’re not strapped into anything, so any screw ups will have you falling a few feet down to the mat below. That means that even if you make it to the top, you’ll have to figure out how you’re gonna get down!
Memberships here are surprisingly affordable considering Basecamp’s awesome location in downtown Reno. Members also have access to the indoor gym that has weights and cardio machines. Adults pay $420 per year for climbing and gym access. If you just want to drop in you can pay $17 per day or $10 per day if you’re a guest at the Whitney Peak hotel!
There’s plenty to do in Reno in terms of gambling and kitschy entertainment, but there’s also a growing community of outdoor lovers, local artists and creators in the city. Besides Basecamp, check out Wyld Market if you’re interested in learning more about the cool local scene. Unfortunately we didn’t have time to stop while we were in town, but this pop up market looks awesome. They feature local makers, whether that be art, products, food and drink or even services that make a positive impact on the community. Check out their calendar to see when and where the next event is: Wyld Market
Where to Stay in Reno
There’s plenty of places to stay in Reno, but we loved our stay at the Peppermill Inn Resort Spa Casino. It’s probably the closest thing to Vegas you’ll get in Reno. This huge resort has 1,621 rooms! They have 15 bars and lounges, 10 restaurants and 82,000 square feet of casino! You could come to Reno, never leave this resort and still have the full Reno experience. We loved our suite in the Tuscany tower, overlooking the 2 pools and 3 hot tubs, which are sustainably heated by a geo-thermal wall. Our only regret was that we didn’t have more time to explore every part of this resort!
Where to Eat in Reno
Considering there are 10 restaurants at the Peppermill, we don’t think you’ll have trouble finding somewhere to eat! The restaurants range from cafe style to buffets to fancy fine dining. Take your pick!
Sand Harbor State Park
We had to spend one last day on the water to cap off our Lake Tahoe Loop road trip, and we’re glad we chose Sand Harbor State Park! This shoreline is absolutely stunning! It’s located in more of a protected part of the lake, so the water is usually still as glass. Unfortunately we visited during a windstorm, so no paddle boarding for us! But we were able to take a couple of kayaks to enjoy the area as the wind calmed down. This part of Lake Tahoe is known for its crystal clear water that shines bright turquoise when the sun comes out. It makes for some gorgeous photos if you climb up a tall boulder and shoot down into the water. You can also rent SUP paddle boards, one person and two person kayaks from Sand Harbor Rentals.
There’s also a couple beach areas in the park that are really popular with families. The sand is soft and it’s the perfect place to park yourself for the day while everyone can enjoy their different water activities or just bask in the sun.
Pro tip: Get there at 8am, just as its opening. On a nice day in the summer, the parking lot can fill up. If you can’t get a spot, park by Flume Trail Mountain Bikes and use the brand new East Shore Trailto walk or bike into the park. You cannot walk in to the park or get dropped off at the entrance. If the parking lot is full, the East Shore Trail is your only access point. This trail is a concrete path, so it’s easy to walk and bike on, and let me tell you, the views are stunning! The trail was just opened in June 2019 to cut down on people parking on the highway and dangerously walking to the lake. We loved our afternoon renting bikes from Flume Trail Mountain Bikes and cruising along the path to Sand Harbor.
The parking lot at Sand Harbor State Park costs $10 per vehicle, and if you choose to enter by the East Shore Trail entrance on bike it’s $2 per person. Please also note that flying a drone is prohibited and we had prior written permission in order to capture photos and video.
Where to Stay in Sand Harbor
There isn’t really much in the way of accommodation around Sand Harbor. Zephyr Cove is only a 25 minute drive, so their resort is a good option, especially if you’re heading back South. There are also plenty of lodges at Incline Village, which is just a 10 minute drive away. Here are some options in that area:
Parkside Inn – This mountain lodge is a great choice, whether you’re bundling up in the snow or playing all day in the sun. They have an indoor heated pool and sauna.
Hyatt Residence Club Lake Tahoe, High Sierra Lodge– If you want to class things up a bit, the Hyatt Residence Club at Lake Tahoe is a beautiful lodge with plenty of accommodation and an amazing location right by the lake. The views are stunning and they have great amenities like a pool, gym and water excursions.
Where to Eat in Sand Harbor
Fumo Cafe Pizzeria & Bar – We randomly wandered into this cafe on a chilly Tahoe morning and we’re so glad we did! With their delicious pancakes, eggs and breakfast potatoes, it totally hit the spot. The service is spot on; they kept the hot coffee coming! This also seems like a great place to stop in for a beer after a long day of skiing.
Overall, we loved our five day road trip on the Lake Tahoe Loop. Even as a neighboring California native, I’m embarrassed to admit that I had no idea there is so much to do in this area! If you’re an adventure lover like us, you’ll be stoked with the choices available. Not only can you mountain bike, kayak, stand up paddle board and hike all in the same week (in the same day if you want!), but you’ll be doing all of those things in the most stunning location. Pair that with a couple days exploring the old school towns of Genoa and Virginia City, as well as taking in the hip adventure scene in Reno, and you’ll have yourself one epic road trip!
This post was created in collaboration with TravelNevada, who helped organize our Lake Tahoe Loop experience. As always, all opinions are our own!
Imagine this… you’ve just been on the most amazing trip and taken some incredible pictures. You’ve documented all your travels, everything from the delicious meals and local architecture, to daily adventures and fun nights out. You can’t wait to get home and upload them, only to realize that your memory card has been corrupted and you’ve lost EVERY. SINGLE. PHOTO!
You would think the chances of this are pretty slim, but after more than ten years of travel you’d be surprised how many times I’ve heard this happen to people I know. From first time travelers to seasoned veterans, the curse of the lost photos can strike anyone when you least expect it.
But don’t panic just yet! The following article outlines a disaster proof plan to combat the potential loss of your travel memories. It starts with backing up your photos onto the Cloud, ensuring you’ve got that extra security built in via Dropbox’s file recovery service. Next you backup your photos on an external hard drive, where you’ll have ready-to-go access for those times without Internet.
Backing Up Photos on the Cloud
The Cloud, a commonly referred to term that confuses the majority of people over 55 years of age (specifically my Dad). Using cloud based services has become synonymous with the Internet these days, with file storage as the main way that people are taking advantage of this fictional cloud in the sky.
The Cloud is simply an easy way to say that your data (in this case photos) is being sent up to a satellite via the Internet, and then it’s being pinged back down to a data center somewhere in the middle of nowhere. From there it stays safely tucked away on a hard drive as big as a factory, where you can remotely access it whenever you have an Internet connection.
Think of your travel photos as little travelers themselves. When you send them off to the ‘Cloud’ they get on an invisible rocket up into the clouds, then descend into the Data Center Inn and stay there until you need them to come back.
Over the last decade online file storage has seen massive improvements. From the amount of space each user has access to, as well as the price it costs if they want to expand their amount of storage. Not only that, but there have been some really useful features built into the services. Dropbox, one of the most established and most trusted services, continues to add more features that help you recover lost files, as well as see the history of changes made to files.
We’ve personally been using Dropbox for the last five years and love it. We’ve found it intuitive and easy to learn. You can organize your files into folders, easily search for specific files and share access to files for people outside your account. And by far one of the greatest features is the file recovery option.
File Recovery of Travel Photos
The file recovery feature of Dropbox lets you reverse the accidental finger slip that saw you delete your whole folder of Lisbon Pics 2019, when all you wanted to do was delete that one embarrassing picture of you vomiting in the street after consuming a dozen Pastel de Natas. With a simple click of a button you can reverse the deleted action quicker than it took you to down a liter of Sangria.
In fact, say you didn’t realize what you had done straight away (probably the Sangria), you’ve still got up to 30 days to go back to recover your files. If you’re on a Professional or Business account you’ve got more time for the trip hangover to wear off, with even more time to rewrite your accidental deletion.
You can toggle a switch that allows you to see what files or folders you’ve deleted and simply hit ‘Restore’ to put them back in action! This feature is perfect for ensuring you have that little bit of extra added security for your files in case anything goes wrong.
Backing Up Photos with an External Hard Drive
The first thing you want to purchase for your next trip is an external hard drive to do daily photo back ups. In the past the cost of hard drives, as well as the size and capacity, was extremely limiting. Now, thanks to technology, external hard drives for travel are extremely accessible.
After each day of shooting, spend five minutes dumping all your files onto an external hard drive. It not only frees up space on your camera memory card, but it gives you a backup copy. It’s also a great time to categorize your files and start to organize them into location, or photo or video.
We actually travel with three external hard drives, but we’re working as professional content creators, so it might be a little overkill for the average traveler. There are a lot of options, but we’ve found the WD My Passport to be a great choice. We create two copies of our photos on two different hard drives, making sure to copy directly from the card each time. That way if one hard drive goes down, we’ll always have a back up until we can upload them to Dropbox.
You might think that having an external hard drive is all you need for securing your files, but you really want to ensure you go that extra mile and back them up online. Just like memory cards, hard drives are fickle and can also get corrupted. You can also drop them, spill a drink on them or lose them.
They are handy for getting faster access to your pictures, especially if you don’t have Internet, but they won’t save your pictures from being lost forever! So along with backing up on an external hard drive, always be sure to back them up online and you’ll never have problems again!
Have you ever had back luck losing photos from your travels? Or do you have any other suggestions we can add to the post? Drop us a comment below!
“This is a sponsored post for Dropbox. All opinions are my own. Dropbox is not affiliated with nor endorses any other products or services mentioned.”