
The first time I ever opened Photoshop to edit some photos I stared blankly at the screen for five minutes, tried to click a few buttons and then closed my laptop in defeat. Having never been particularly tech savvy I just didn’t know where to start! To me it looked more like a space station command center than a photo editing program, and my initial reaction was ‘it’s just too difficult’.
But like all things in life, you have to at least give it a crack before you can give up. So I sat myself down one afternoon with a beer and some new found confidence, and tried again.
Editing travel photos in Photoshop doesn’t have to be a massive mission. Instead it should be a fun and exciting journey to watch your great travel photos become even greater. Editing travel photos for publication is something everyone does, or at least they should do. There’s no shame in admitting that your photos look better once edited, so as a budding photographer or blogger this should be high on your agenda of things to learn about.
Before You Start Editing
Before I talk about editing travel photos in Photoshop, there’s just one golden rule! Don’t ever your new photos edits over your original photo. NEVER CLICK SAVE! There might be no turning back and you could be stuck with those changes.
Once you’re done with any edits always be sure to click ‘Save As’ or ‘Save As Web’. You want to leave the original photo file as it is, and you don’t want to save any permanent edits that can’t be undone. You never know when you might want to go back and make some changes. Specifically once your Photoshop skills improve.
An even better alternative is to make a duplicate copy of the file, and tinker around on that. Once you’ve opened your photo file go to Image–>Duplicate. A pop-up box gives you the option of naming it something different, or just calling it ‘copy’. Now you can play around with the duplicate without the worry of accidentally saving over your file.
Another handy function that might come in use, especially if you make a lot of edits that you’re not happy with is Revert. Found in File–>Revert, this function takes your picture back to its original state. If you’ve made a million and one changes and just want to get back to the start without going step by step, just hit Revert to take you back. Now you can start again!

An unedited raw shot of the beach. Notice the faded sky, bland colors and lack of pop!

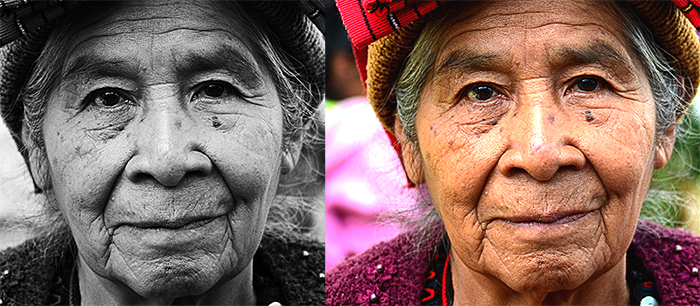
Same photo using the ‘Color Balance’ function and a few other edits, Contrast and Vibrance. (Over exaggerated color used for example).

Same photo once again with a Black & White adjustment layer, some Smart Sharpen, a bit of Contrast and Levels work and a Color Balance adjustment layer.
Hit Up The Forums and YouTube
If you’re a newbie like I was, get ready to utilize the extensive range of resources on the internet. I can’t tell you how many YouTube videos I’ve watched over the last year that taught me how to create awesome black and white portrait pictures, or how to use functions like Levels, Curves, Layers, Smart Sharpen, Color Balance just to name a few.
It might seem like a stupid Google search request to ask ‘how to make photos black and white in Photoshop’, but let’s face it, there are much worse search responses than that. I mean just start to type ‘how to make…’ into Google and see what you get. A tutu, French toast, a paper plane and money are some of the top results! No question is too embarrassing for the internet.
Experiment!
Once you get familiar with the layout of Photoshop you’ll naturally start to spread out and experiment with more editing functions. Just sample everything! As long as you’ve made a copy you can go to town on your picture. Open up a couple of different styles of photo (portrait, landscape, beach, colorful, etc) and see how each change looks on each particular photo.
You’ll find that certain pictures work better with some changes than others. Some good beginner ones to check out under Image–>Adjustments are Vibrance, Brightness/Contrast, Color Balance, Hue/Saturation, Black & White and Shadows/Highlights.

A couple of easy edits using Vibrance, Contrast, Smart Sharpen and Saturation.

Using a Black & White adjustment layer first, then altering the Levels on the Background Layer. Next is Smart Sharpen and Highlights.
Stick With It
Photoshop can be incredibly complicated. As overwhelming as this feels for beginners it leaves a lot of room to grow and continue to develop your skills. When you’re just starting out, it can be frustrating to go into Photoshop with a vision, but not understand the steps it takes to achieve that vision. With a bit of persistence, however, you’ll soon learn the capabilities of each tool. As you continue you’ll find your Photoshop skills rapidly improving and your photos becoming better and better.
Your photos are often the most tangible memories you have from your travels. It’s an easy way to show your experiences to family and friends and a reminder for yourself just how incredible your adventures were. With a bit of Photoshop editing, your photos can turn into beautiful pieces of art and accurate reflections of the visuals of your journey.
Did you find our beginners guide to editing travel photos helpful? What tips and tricks would you like to learn next? Drop us a comment below or hit us up on Facebook or Twitter!


Great tips Julian. “Sticking with it” is the hard one for me sometimes. It has taken me a while to get the time and sit down and learn more. But once you got the hang of your camera and the basics of shooting, it is definitely worth the time. I am still getting my head around Photoshop. I find Lightroom a lot easier to use. Will have to look up some tutorials on Photoshop and learn more. Thank you for your post and your examples. Your photos are beautiful.
Yep agreed with ‘sticking with it’! I just recently upgraded my camera (still a Nikon, just better) and i really need to knuckle down and learn about all the great new features. I’ve always started on Photoshop, but i’ve heard great things about Lightroom. I might need to check it out. Glad you enjoyed the post 🙂
We just stumbled over your site on twitter. We will certainly go through all your posts to improve our photos.
Thanks guys 🙂 Let us know if you have any questions.
Thanks a lot for sharing such a fantastic guide about photo editing. I definitely appreciate your work. Please keep posting more update on your page. I will certainly dig it and personally suggest to my friends. I’m sure they’ll be benefited from this website.
Thanks again.